Unikraft启动过程
启动过程中的函数关系
本节内容基于官方Session2的HelloWorld + FileSystem的案例,开启debug和Info信息以后,根据日志分析得出。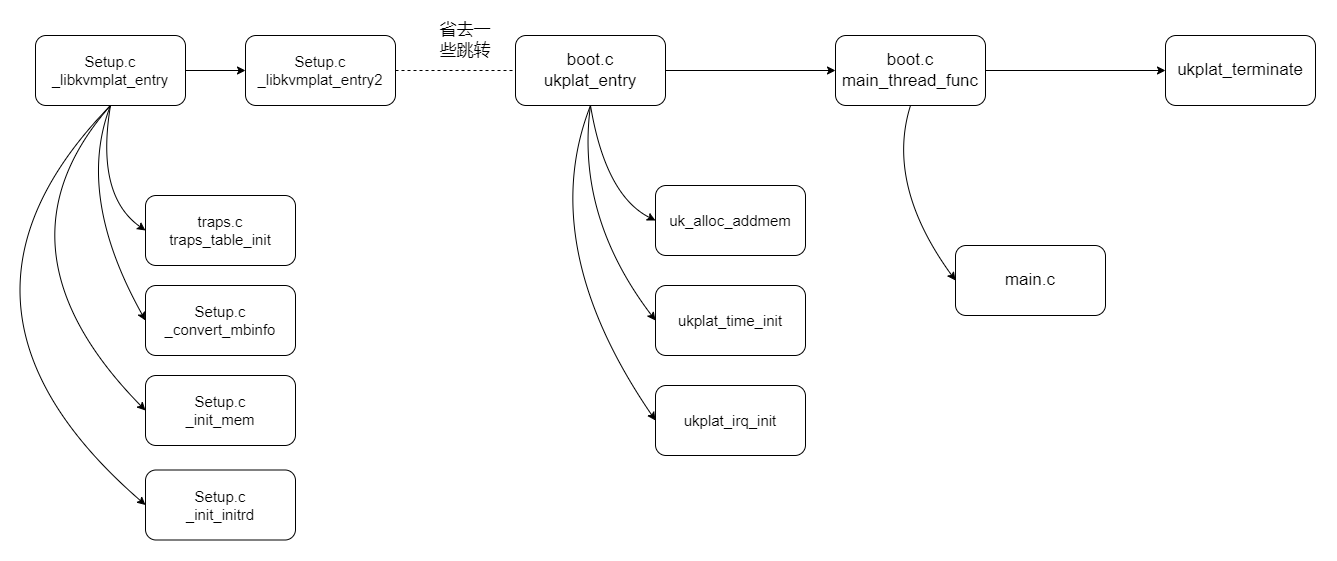
简要流程分析
_libkvmplat_entry
该函数作为Unikraft程序的第一个入口,应该是作为bootloader的位置存在。bootloader的主要功能就是装载内核和initrd。
该函数主要完成了以下功能模块的初始化。
- 初始化Trap向量表。Trap向量
- 初始化BSP(BootStrap Process), BSP用于启动执行操作系统初始化代码。
- 获取cmd参数、初始化堆栈、initrd。initrd被用作临时的文件系统,知道真正的文件系统被挂载。
- 将BootStrap stack 切换到 申请到的stack
- 启动_libkvmplat_entry2
从日志中可以看到,setup.c的108行打印了一句“No initrd present”。而setup.c的108行是_convert_mbinfo函数,该函数的作用应是读取multiboot提供的配置信息,然后设置boot的一些配置信息,boot的配置信息是通过一个叫做uk_bootinfo的结构体定义的。1
2
3
4
5
6
7
8
9
10
11
12
13
14
15
16
17
18
19
20
21
22
23
24
25
26
27
28
29
30
31struct uk_bootinfo {
/* Command line information */
// 命令行信息
__u64 u64_cmdline;
/* Memmory mapping information */
// 内存映射信息
size_t max_addr; // 最大内存大小
/* Initrd information */
// Initrd信息
__u8 has_initrd; // 是否存在Initrd
uintptr_t initrd_start; // initrd起始地址
uintptr_t initrd_end; // initrd终止地址
size_t initrd_length; // initrd大小
};
1 | [ 0.000000] Info: {r:0x10b8fe,f:0x1bcfd8} [libkvmplat] <setup.c @ 468> Entering from KVM (x86)... |
之后,通过bootinfo提供的信息初始化内存、initrd、cmd。
init_mem
该部分主要是根据boot_info的信息,对系统的堆栈进行初始化。
init_initrd
由于_convert_mbinfo中,设置了has_initrd = 0;因此,unikraft在启动过程中不会初始化initrd。如果缺少了initrd,那就需要通过指定参数启动操作系统。
之后推出引导堆栈,进入到_libkvmplat_entry2函数中。
_libkvmplat_entry2
进入到_libkvmplat_entry2以后,经过一系列跳转会到ukplat_entry。在ukplat_entry中,到这一步,才是真正在引导系统文件启动。
在ukplat_entry中,主要完成了这几件事。
- 准备启动main函数的参数。
- 调用constructor,对一些本次Unikraft构建的镜像中一些库进行注册。
- 接管底层提供的内存区域。
- 初始化中断子系统和时间子系统。
- 初始化cooperative scheduler、idle线程、用于执行main函数的线程。
- 启动main_thread_func函数。
在调用constructor阶段,通过日志只能尝试分析出三个模块被构建。分别是vfs、标准输入输出、bus handler。其他的由于日志信息和代码原因,暂时难以分析,这是未来需要深入的一个方向。接下去就是对内存区域的申请划分,这段主要涉及到与qemu的交互,暂时还没有深入去看。简单地说,KVM划分好内存区域,然后unikraft对KVM提供内存区域进一步划分。1
2
3
4
5
6
7
8
9
10
11
12
13
14
15...
[ 0.000000] dbg: {r:0x119c1b,f:0x7fdff48} [libukboot] <boot.c @ 203> Call constructor: 0x122a30())...
[ 0.000000] dbg: {r:0x119c39,f:0x7fdff48} [libukboot] <boot.c @ 204> ctorfn name = 0x122a30f
[ 0.000000] dbg: {r:0x13278e,f:0x7fdff18} [libvfscore] <main.c @ 1915> (int) uk_syscall_r_dup2((int) 0x0, (int) 0x1)
[ 0.000000] dbg: {r:0x1323fc,f:0x7fdfea8} [libvfscore] <main.c @ 1862> (int) uk_syscall_r_dup3((int) 0x0, (int) 0x1, (int) 0x0)
[ 0.000000] dbg: {r:0x13278e,f:0x7fdff18} [libvfscore] <main.c @ 1915> (int) uk_syscall_r_dup2((int) 0x0, (int) 0x2)
[ 0.000000] dbg: {r:0x1323fc,f:0x7fdfea8} [libvfscore] <main.c @ 1862> (int) uk_syscall_r_dup3((int) 0x0, (int) 0x2, (int) 0x0)
...
[ 0.000000] dbg: {r:0x119c1b,f:0x7fdff48} [libukboot] <boot.c @ 203> Call constructor: 0x13aca0())...
[ 0.000000] dbg: {r:0x119c39,f:0x7fdff48} [libukboot] <boot.c @ 204> ctorfn name = 0x13aca0f
[ 0.000000] Info: {r:0x11c444,f:0x7fdff18} [libuklibparam] <param.c @ 113> libname: vfs, 96
[ 0.000000] dbg: {r:0x119c1b,f:0x7fdff48} [libukboot] <boot.c @ 203> Call constructor: 0x10d120())...
[ 0.000000] dbg: {r:0x119c39,f:0x7fdff48} [libukboot] <boot.c @ 204> ctorfn name = 0x10d120f
[ 0.000000] dbg: {r:0x11a0ae,f:0x7fdff28} [libukbus] <bus.c @ 52> Register bus handler: 0x1b9000
...
与简单的HelloWorld相比,增加了FileSystem的HelloWorld,文件系统的挂载也是在这一部分被调用。
1 | [ 0.124497] dbg: {r:0x10d7a5,f:0x7f1ff60} [libkvmpci] <pci_bus_x86.c @ 213> Probe PCI |
main_thread_func
在这里的main_thread_func函数其实包括了打印banner和启动真正的main函数的过程。最后就是真正进入到该系统镜像所需要执行的main函数。
main_thread_func函数主要完成了以下功能。
- 根据init函数表,对已经注册的一些库调用init函数,例如,让一些库从一开始就启动。
- 打印Unikraft banner信息。
- 调用真正的main函数。
在这个函数中,需要注意的是main函数是什么时候被替换成我们所需要的Main函数。我们可以在ukboot下的weak_main文件中可以看到最原始的main实现。在C语言中,__attribute__((weak)) 标记是一个弱标记。当链接器发现同时存在强标记和弱标记时,优先调用强标记。如果只存在弱标记,则调用弱标记;如果都不存在,则编译出错。即,如果外部模块存在一个强标记的main,则优先调用外部模块的main。1
2
3
4
5
6
7
8
9
10
11
12
13
14
15
/* Internal main */
int __weak main(int argc __unused, char *argv[] __unused)
{
printf("weak main() called. Symbol was not replaced!\n");
return -EINVAL;
}
可以看到,该main函数就是被用于替换的。那么真正的main函数是什么时候被替换的呢?
查看ukboot下的makefile文件下的注释可以看到。一开始确实链接的weak_main.c,但是在对应的工程目录下,存在一个Makefile.uk文件,该文件将真正的main函数链接,替换掉原本的weak main函数。1
2
3
4
5
6
7
8
9
10
11# The main() is in the separate library to fool the LTO. Which is
#
# This does not sound right, but LTO does not work well with
# v9. But we have to deal with it now.
$(eval $(call addlib_s,libukboot_main,$(CONFIG_LIBUKBOOT)))
LIBUKBOOT_MAIN_SRCS-y += $(LIBUKBOOT_BASE)/weak_main.c1
2
3
4
5
6
7
8
9
10.
├── build
├── guest_fs
├── kraft.yaml
├── launch.sh
├── log
├── main.c
├── Makefile
├── Makefile.uk
└── qemu-guest
1 | $(eval $(call addlib,apphelloworld)) |
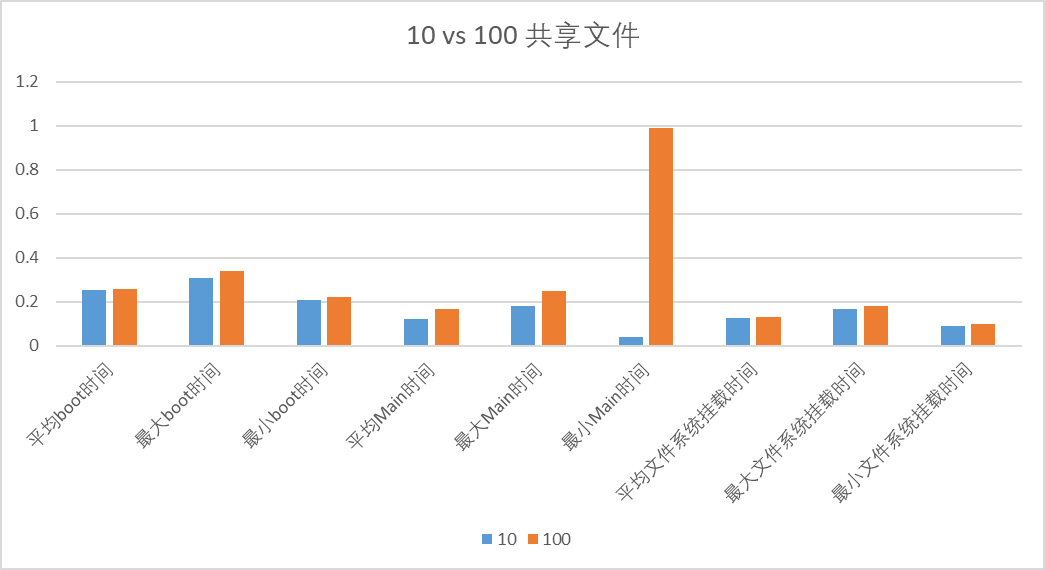
启动时间分析
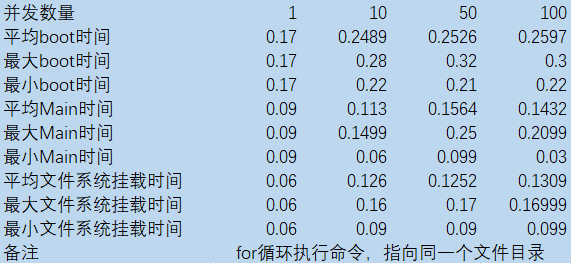
在编译系统镜像的时候,开启了info信息输出,可以看到隔壁执行的时间点。由此我们可以得出各个模块的启动时间,本文粗略地对HelloWorld + FileSystem的案例进行一个启动时间的分析。
脚本编写
通过使用Python的multiprocess、os库,可以多进程的执行命令。就可以达到多进程同时启动unikraft进行的过程。
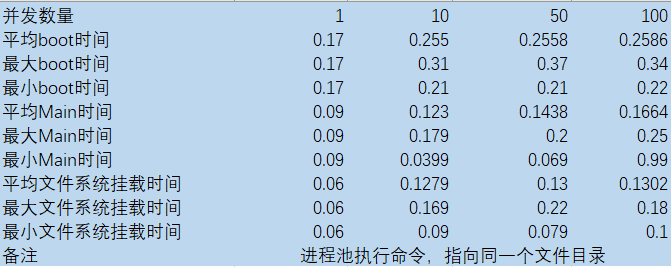
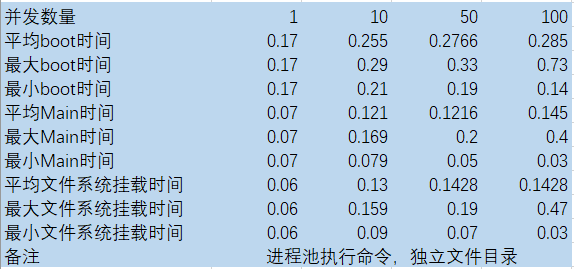
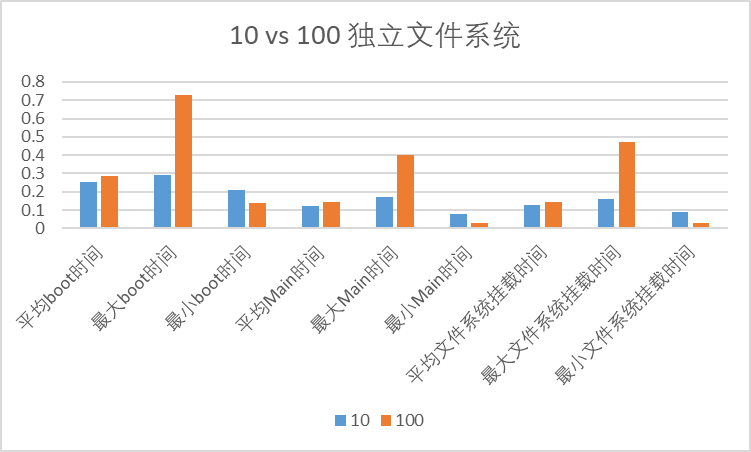
使用multiprocess的进程池,可以实现准确度比较高的并发。同时还测试了一下for循环启动进程的方式,这种方式的缺点是可能真实的并发度远远不到预期设置的标准。
由于本次实验的镜像需要挂载文件系统,因此就有两种情况。